OAuth 2.0 (Partners)
Overview
Apollo supports the OAuth 2.0 authorization flow to build Apollo integrations. By using this flow, your app's users can enter their Apollo account credentials and grant you permission to retrieve data via Apollo's APIs.
Preview the Authorization Flow for Your Users
Apollo supports the OAuth 2.0 authorization code grant type. Your app's users will follow these 3 steps when using their Apollo credentials to authenticate:
- The user enters their Apollo credentials in your app. A new browser window opens.
- The user can see your app name and logo, as well as the permissions you are requesting they authorize. After reviewing the requested permissions, the user grants your app access.
- The user is redirected back to your app.
Unseen to your users, the redirect URL you provide to Apollo includes an authorization code in the query string. Your app sends a request to the OAuth 2.0 server to exchange the authorization code for an access token.
Before You Start Building
The end users of your app or integration must have the appropriate permissions in their Apollo account to implement the authorization flow.

Unauthorized UsersTo authorize your integration via OAuth, an Apollo end user must have the necessary permissions. For teams on an Apollo plan that enables custom permission profiles, the user needs to have the Can authorize third-party apps/integrations via OAuth permission enabled in Apollo. For teams on a plan that doesn't include custom permissions, the user must be assigned either the Admin or Billing and Seat Manager permission profile.
If a user without this permission attempts to authorize, they will be redirected according to the OAuth redirect URL you will set later in this process. The following error code will be appended to the redirect URL:
status\_code=403\&error\_message=You%20do%20not%20have%20permission%20to%20connect%20integrations.%20Please%20contact%20your%20Apollo%20admin%20to%20review%20and%20authorize%20this%20integrationRecommended handling: You can choose to display a user-friendly message, such as a pop-up or other visual element, explaining the required permissions. If no message is configured, the user will only see the error message within the URL.
This authorization method supports only the API endpoints listed in Apollo's public API documentation. Ensure that the endpoints you need for your use case are available before implementing OAuth.
If you have the appropriate permissions and have confirmed the availability of endpoints, proceed to step 1.
Build OAuth Authorization Flow
Step 1: Register Your App With Apollo
To set up an OAuth flow, you need to provide Apollo with details about the purpose of your organization using the flow. Once registration is approved, you can use the Apollo playground to test the OAuth flow before attempting to implement it.
To register your application with Apollo:
- Launch Apollo and click Settings > Integrations > API Keys.
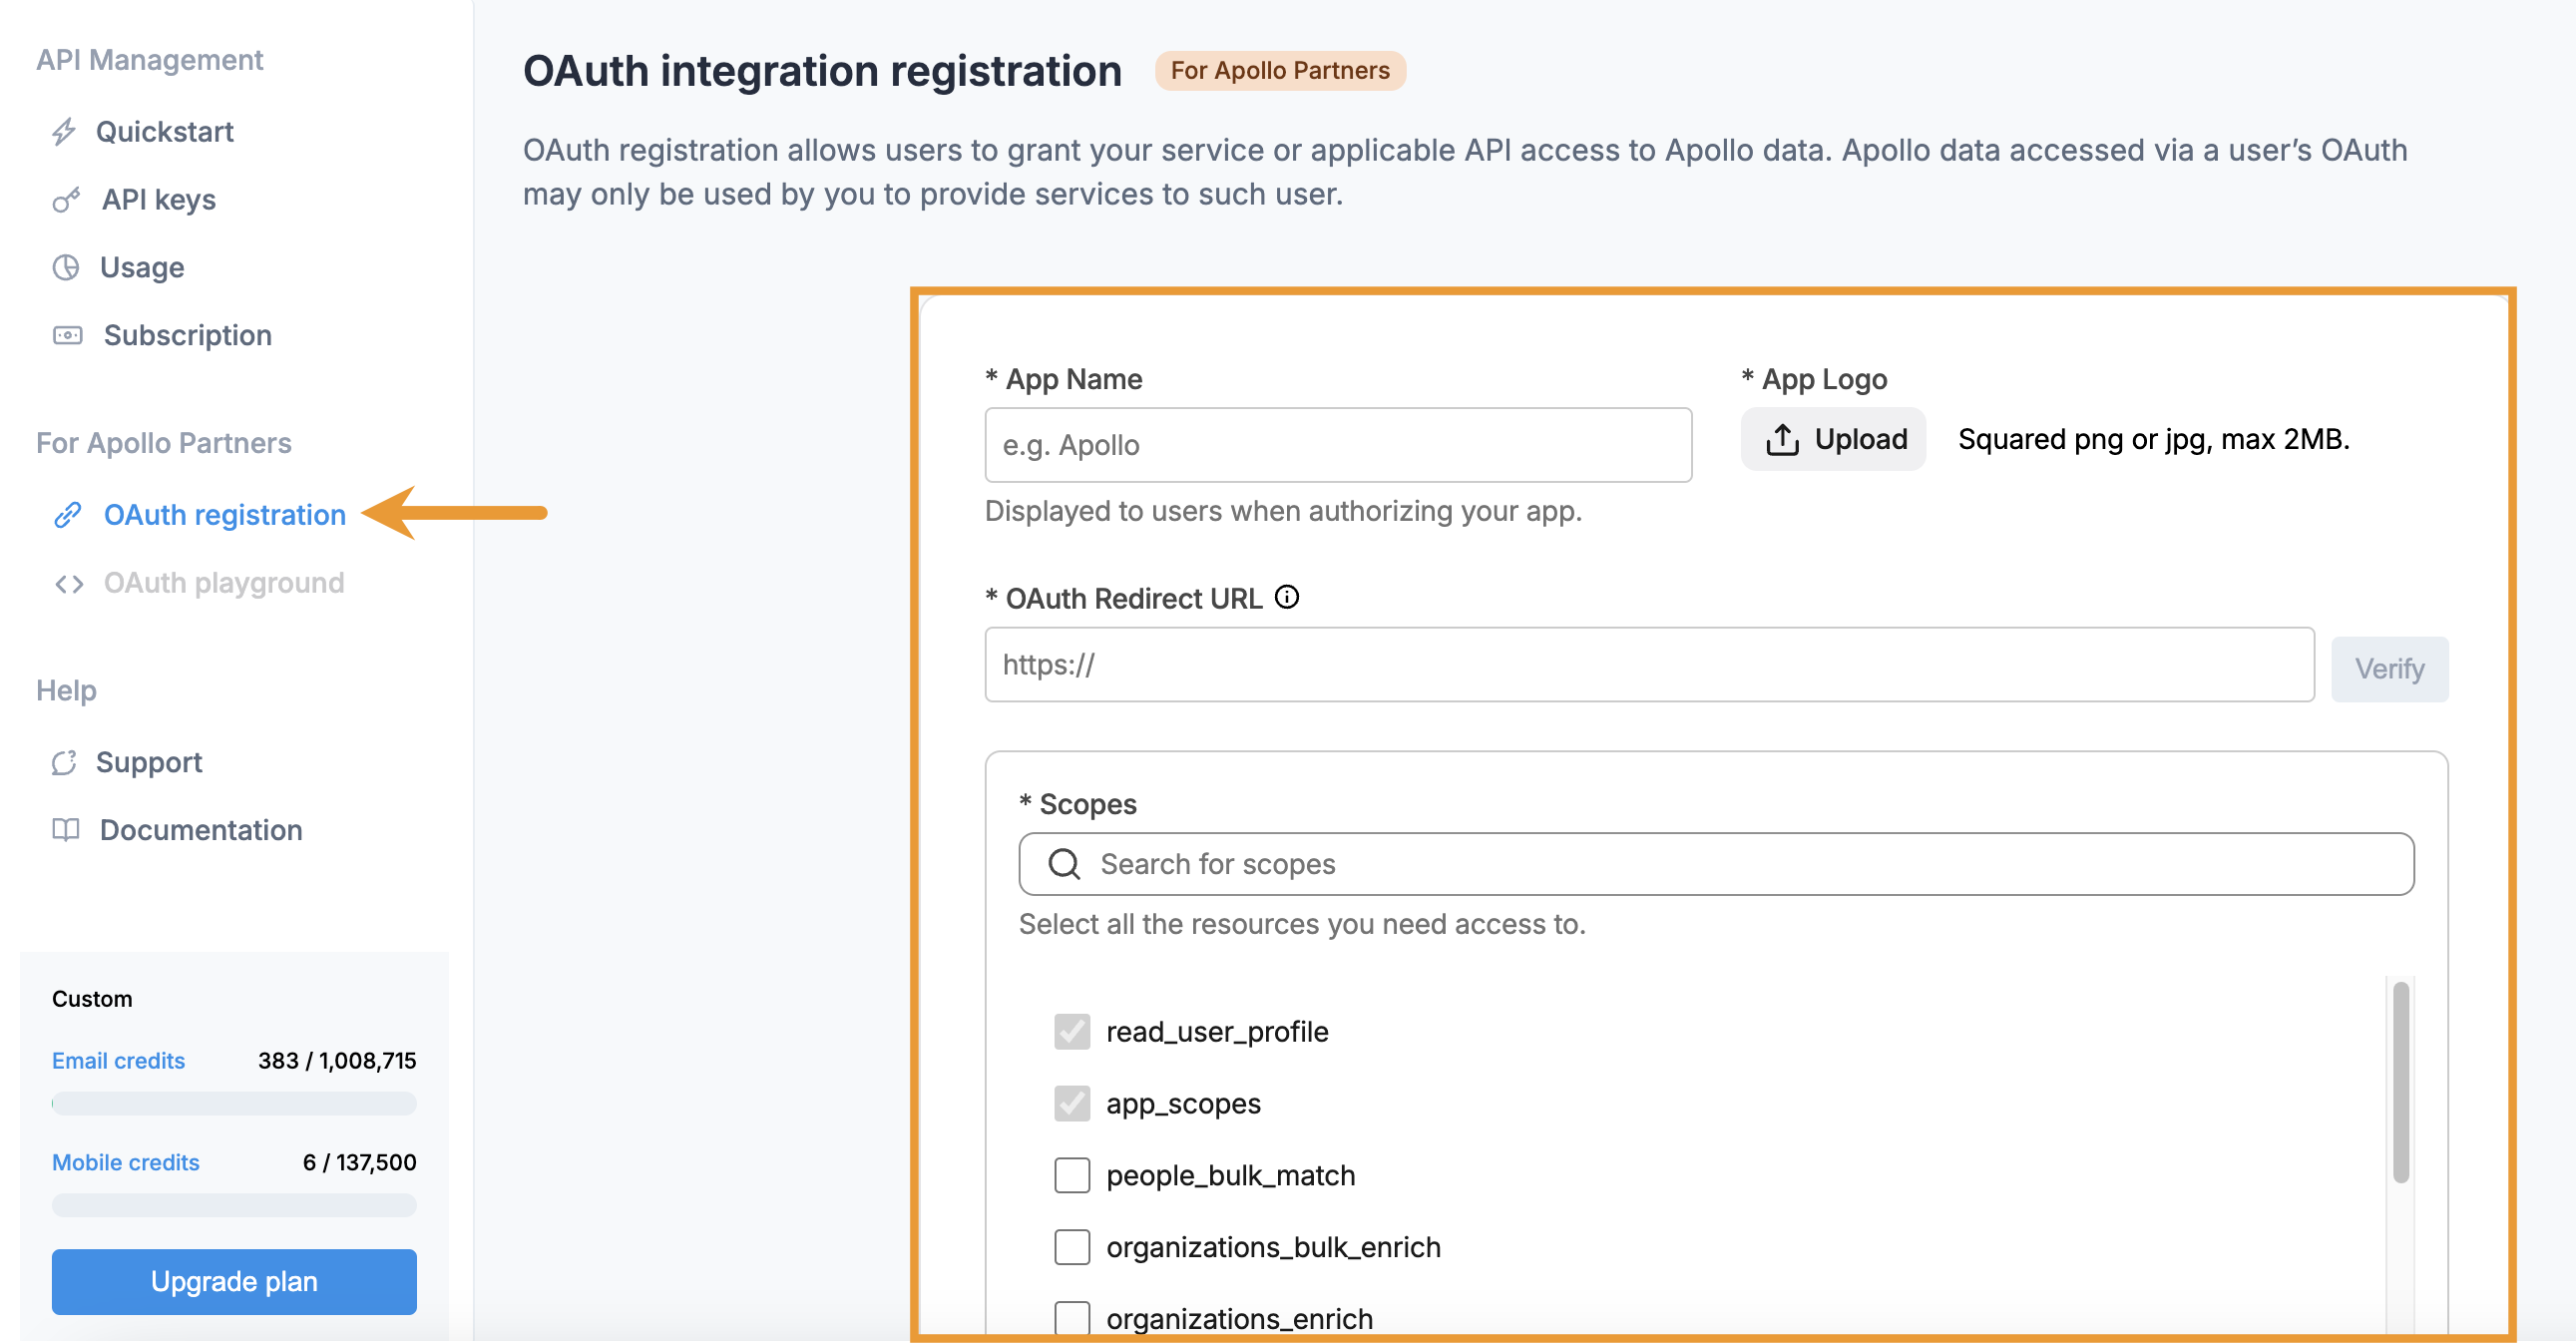
- Click OAuth registration, then enter the following information. When your users authenticate with an Apollo account, they will see the app name, app logo, and scopes you enter here.
- App Name: The name of your app or product.
- App Logo: Upload the logo for your app.
- OAuth Redirect URL: The URL that the user will be redirected to after they authorize your app for the requested scopes. This URL must use
https. To make multiple URLs available for use, add the URLs with each URL separated by a comma. Multiple redirect URLs enables you to implement different OAuth flows and redirect users based on the needs of each flow, such as flows for different types of users or flows for different areas of your product. You can add up to 4 redirect URLs. - Scopes: Set the scopes, or permissions, for your app. Each scope provides access to specific Apollo API endpoints. Only add scopes that are necessary for your app's functionality. By default, Apollo adds
read_user_profile, which provides basic user info, andapp_scopesfor all selected scopes.
Locked InIn the future, if you edit these scopes, you need to repeat this entire authorization flow to set up OAuth again.
- Click Submit.
- Copy the client ID and secret to use in the next steps.
The client ID is a public identifier for your app and is used to identify your app during the OAuth flow. It appears on the OAuth integration page of the Apollo developer portal.
The client secret is a confidential key used to authenticate your app. It secures communication between your app and Apollo's OAuth server. The only time the secret is displayed is when it is generated. Store it in a secure location as it will not be shown again.

With the client ID and secret in hand, you are ready to build the authorization code flow.
Optional: Test the OAuth Flow Before Building
Once your app is registered with Apollo, the playground becomes available in the developer portal. The playground enables you to quickly test the OAuth flow before you attempt to implement it in your app.
To test the OAuth flow:
- Click OAuth Integration > Playground.

- Enter a redirect URL, then click Get authorization code. Copy this code to use in the next step.

- Paste the authorization code from the previous playground step and the client secret that you generated when registering your app. Then, click Get access token. Copy the access token to use in the next step.

- Paste the access token from the previous playground step. Then, click Fetch data.

If you're successful in retrieving data, proceed to building the OAuth flow in your app.
Step 2: Build Authorization Code Flow
With your client ID and secret in hand from step 1, you're ready to build the authorization code flow. When sending users to Apollo's OAuth 2.0 server, the authorization URL identifies your app and defines the resources (scopes) it's requesting to access on behalf of users.
The following parameters can be used to build your authorization URL:
| Parameter | Required | Description | Example |
| client_id | yes | The client ID identifies your app. The client ID was generated in step 1. | -FaKj9ikI5rafgwPKJId1DwbzhR1VHvQAe7UEAVH_5k |
| redirect_uri | yes | After a user authorizes your app for the requested scopes, they are . | https://www.example.com/callback |
| response_type | yes | This must be code | code |
| scope | no | To request specific permissions, you should include the scope are used. Each scope you add needs to be separated by URL-encoded spaces. If you're passing the scope parameter in the URL and need | contacts_search%20person_read |
| state | no | A unique string value that you can use to maintain the user's state when they are redirected back to your app. It ensures the response matches the initial request by including and verifying the state value during the redirection process. | WeHH_yy2irpl8UYAvv-my |
With your parameters in mind, call the following endpoint:
https://app.apollo.io/#/oauth/authorize?client_id=<your_client_id>&redirect_uri=<redirect_uri>&response_type=code&scope=contacts_search%20person_read&state=xxxxxxxxThis directs users to the Apollo log-in options. After the user submits valid Apollo log-in credentials, they can review the permissions you are requesting
If they authorize access, you receive an authorization code from Apollo, and the user is redirected to the redirect URL you provided to Apollo.

Step 3: Exchange Authorization Codes for Access Tokens
With the authorization code from step 2, you can obtain the access token and refresh token that will be used for subsequent requests to the Apollo API.
To retrieve access tokens, call the following endpoint using the following required parameters:
POST https://app.apollo.io/api/v1/oauth/token| Parameter | Description | Example |
| grant_type | This must be authorization_code. | authorization_code |
| code | The authorization code received from the OAuth 2.0 server in step 2. | MUsgYj77Jc8r07qH2szUh125xqi2AV7eBhsfPnYOhmo |
| client_id | Your app's client ID. This was generated in step 1. | vvZd-i_3MsfI6gmktGJY7F-kTE42SrO1RB9W8avPp0h |
| client_secret | Your app's client secret. This was generated in step 1. | N6CW_m_0FNl8hapshH4Wy4jr3uT8XqsERzdniY74Tw5 |
| redirect_uri (optional) | Only utilize this parameter if you want to change the redirect URL or as a scope in step 2. | https://www.example.com/callback |
The following are example requests in Node.js and Python:
const formData = {
  grant_type: 'authorization_code',
  client_id: YOUR_CLIENT_ID,
  client_secret: YOUR_CLIENT_SECRET,
  redirect_uri: REDIRECT_URI,
  code: req.query.code
};

request.post('https://app.apollo.io/api/v1/oauth/token', { form: formData }, (err, data) => {
  // Handle the returned tokens
});
import requests
form_data = {
"grant_type": "authorization_code",
"client_id": YOUR_CLIENT_ID,
"client_secret": YOUR_CLIENT_SECRET,
"redirect_uri": REDIRECT_URI,
"code": code
}
response = requests.post("https://app.apollo.io/api/v1/oauth/token", data=form_data)
# Handle the returned tokensA successful response (JSON) delivers the access token and refresh token.
{
   "access_token": "6vJtf0jt94Km1WxYsH29DE98xVgsNp8wCHFZMcIZdAg",
   "token_type": "Bearer",
   "expires_in": 2592000,
   "refresh_token": "mVml3fpNBkIpIe3_DWvQ4iP_5h_cvYxOp6pYpZwGz0o",
   "scope": "read_user_profile app_scopes opportunity_write",
   "created_at": 1718366695
}
Token ExpirationThe access token expires after 30 days. The
expires_infield of the response shows the equivalent of 30 days in seconds.Be sure to understand how to use the
refresh_tokento refresh access tokens when building your authorization flow.
Step 4: Use Access Tokens
Once the authorization code flow is completed, use the access tokens received in step 3 to make requests for your app on behalf of your users. To do this, provide the access token as a bearer token in the authorization HTTP header.
The following example shows how to format the header in Postman to call the Bulk Create Tasks endpoint. Review the API reference docs to learn how to use other Apollo API functionality.

Step 5 (Ongoing): Refresh Access Tokens
Access tokens expire after 30 days. Your app can exchange the received refresh token for a new access token and refresh token by calling the following endpoint using the following parameters:
POST https://app.apollo.io/api/v1/oauth/token| Parameter | Description | Example |
| grant_type | This must be refresh_token. | refresh_token |
| refresh_token | The refresh token received when the user authorized your app in step 3. | MUsgYj77Jc8r07qH2szUh125xqi2AV7eBhsfPnYOhmo |
| client_id | Your app's client ID. This was generated in step 1. | vvZd-i_3MsfI6gmktGJY7F-kTE42SrO1RB9W8avPp0h |
| client_secret | Your app's client secret. This was generated in step 1. | N6CW_m_0FNl8hapshH4Wy4jr3uT8XqsERzdniY74Tw5 |
| redirect_uri (optional) | Only utilize this parameter if you want to change the redirect URL or as a scope in step 2. | https://www.example.com/callback |
| scope (optional ) | To reduce the scopes associated with an existing access token, you should include the desired scopes in the request to generate new access and refresh tokens. However, the scope specified in this request must be included in | contacts_search%20person_read |
The following are example requests in Node.js and Python:
const formData = {
  grant_type: 'refresh_token',
  refresh_token: REFRESH_TOKEN,
  client_id: YOUR_CLIENT_ID,
  client_secret: YOUR_CLIENT_SECRET
};

request.post('https://app.apollo.io/api/v1/oauth/token', { form: formData }, (err, data) => {
  // Handle the returned tokens
});
import requests
form_data = {
"grant_type": "refresh_token",
"refresh_token": REFRESH_TOKEN,
"client_id": YOUR_CLIENT_ID,
"client_secret": YOUR_CLIENT_SECRET
}
response = requests.post("https://app.apollo.io/api/v1/oauth/token", data=form_data)
# Handle the returned tokensA successful response (JSON) delivers a new access token and new refresh token.
{
   "access_token": "IFuV6LMQoNGfzuvJTbqU-jY5DD9iJVTiCoqm3v5uZPU",
   "token_type": "Bearer",
   "expires_in": 2592000,
   "refresh_token": "OeV84CtgzB6NK5BJxA_INSau7svEjhp2IuYOzkZYgQg",
   "scope": "read_user_profile app_scopes opportunity_write",
   "created_at": 1718366832
}
The access token should be used to make calls on behalf of the user. When the access token expires, follow these same steps again to retrieve a new one.
Revoked TokensOnce you use the refresh token to generate a new access and refresh token, the existing tokens are automatically revoked and are no longer valid.
Get User Profile Info
If you need to retrieve a user's basic profile info to determine who owns an access token, call the following endpoint and provide the access token as a bearer token in the authorization HTTP header:
GET https://app.apollo.io/api/v1/users/api_profileUpdated 3 days ago